<?xml version="1.0" encoding="UTF-8"?>
<rss xmlns:content="http://purl.org/rss/1.0/modules/content/" xmlns:wfw="http://wellformedweb.org/CommentAPI/" xmlns:dc="http://purl.org/dc/elements/1.1/" xmlns:atom="http://www.w3.org/2005/Atom" xmlns:sy="http://purl.org/rss/1.0/modules/syndication/" xmlns:slash="http://purl.org/rss/1.0/modules/slash/" version="2.0">
  <channel>
    <title>Blog | Kamil Ogórek</title>
    <link>https://kamilogorek.com/</link>
    <atom:link href="https://kamilogorek.com/feed.xml" rel="self" type="application/rss+xml"/>
    <description>Trying to make people's lives easier. API and Integrations Lead at @supabase. Previously @getsentry.</description>
    <lastBuildDate>Tue, 04 Nov 2025 10:43:21 GMT</lastBuildDate>
    <language>en</language>
    <generator>Lume v2.5.0</generator>
    <author>
      <name>Kamil Ogórek</name>
      <uri>https://kamilogorek.com</uri>
    </author>
    <item>
      <title>Customizing the macOS Finder Toolbar with "Open Current Directory in Zed"</title>
      <link>https://kamilogorek.com/blog/finder-toolbar-app-shortcut/</link>
      <guid isPermaLink="false">https://kamilogorek.com/blog/finder-toolbar-app-shortcut/</guid>
      <description>
        How to add a handy shortcut to your Finder toolbar that allows you to open the current working directory in the editor of your choice.
      </description>
      <content:encoded>
        <![CDATA[<img src="https://kamilogorek.com/assets/images/blog/finder-toolbar-app-shortcut.png" alt="Finder App Shortcut" width="600" style="display: block; margin: 1.5em auto;" />
<p>A friend of mine, Terry, asked a question on Twitter.</p>
<blockquote>
<p>A long time ago, I added this button to open the current folder in vscode.</p>
<p>I obvs want it to open cursor now, but can't figure out how I put it up there!</p>
<p>Anyone know?</p>
</blockquote>
<p>— <a href="https://x.com/saltcod/status/1890727453124968831">https://x.com/saltcod/status/1890727453124968831</a></p>
<p>Well, I did not know how to do it, but because I always like to learn random things and, most of all, help people, I decided to figure it out. Here's how to do it in a few simple steps.</p>
<ol>
<li>Open the <code>Automator</code> app and create a new Application.</li>
<li>Add two steps: <code>Run AppleScript</code> and <code>Run Shell Script</code>.</li>
<li>Fill the <code>AppleScript</code> step with the script below. It will grab the currently active <code>Finder</code> window and extract its current directory.</li>
</ol>
<pre><code class="language-txt">on run {input, parameters}
	tell application &quot;Finder&quot;
		set currentFolder to (target of front window) as alias
		return POSIX path of currentFolder
	end tell
end run
</code></pre>
<ol start="4">
<li>Fill the <code>Shell Script</code> step with <code>/usr/local/bin/zed &quot;$1&quot;</code> or any other editor of your choice.</li>
<li>Press <code>Cmd + S</code> to save the automation. It should now be accessible under <code>Applications</code> on your system.</li>
<li>Go to your <code>Applications</code>, right-click the newly saved automation, and select <code>Get Info</code>.</li>
<li>Drag the application you used in your script and drop it on top of the small icon in the top left corner of the info window. This will give you a nicely styled icon.</li>
<li>Open a new <code>Finder</code> window (you need two separate windows for this step), right-click on the toolbar, and select <code>Customize Toolbar...</code>.</li>
<li>Focus on your original <code>Finder</code> window with <code>Applications</code>, then drag and drop your automation next to the rest of your toolbar icons.</li>
<li>You're done! Now you can click your new shortcut in any <code>Finder</code> window, and it will open your editor with a workspace set to that very directory.</li>
</ol>
]]>
      </content:encoded>
      <pubDate>Sat, 15 Feb 2025 00:00:00 GMT</pubDate>
    </item>
    <item>
      <title>Downloading YouTube Watch Later Playlist</title>
      <link>https://kamilogorek.com/blog/downloading-youtube-watch-later-playlist/</link>
      <guid isPermaLink="false">https://kamilogorek.com/blog/downloading-youtube-watch-later-playlist/</guid>
      <description>
        There are times when you don't have access to the internet. Be it during travel, on a plane, on a train, or during a layover. However, those are perfect opportunities to follow up on some of your favorite channels and clear up your long-overdue "Watch Later" playlist.
      </description>
      <content:encoded>
        <![CDATA[<p><em>This post is mostly for myself, as I do this quite often and always forget where to find my copy-pasteable solution. However, I believe it might come in handy for some of you as well.</em></p>
<p>There are times when you don't have access to the internet. Be it during travel, on a plane, on a train, or during a layover. However, those are perfect opportunities to follow up on some of your favorite channels and clear up your long-overdue &quot;Watch Later&quot; playlist.</p>
<p>Using &quot;Watch Later&quot; is the most convenient way, as YouTube has a shortcut for it everywhere. In its web app as a small &quot;clock&quot; button, in the mobile app as a separate action, or in the TV app as an additional option in the overlay.</p>
<p>However, it's not possible to make this playlist publicly accessible. Because of that, any tool that could be used to use it as the data source for video fetching will require generating an authentication token in order to work.</p>
<p>Moving all videos from the &quot;Watch Later&quot; playlist to a regular, public one and then using it directly is one of the possible solutions, but it's cumbersome, and you have to remember to clean it up after each use.</p>
<p>Fortunately, it's easy enough to extract all the necessary urls using a small devtools snippet, and then plug them in directly into the prepared shell script.</p>
<hr>
<p>As a prerequisit, you must have <a href="https://github.com/yt-dlp/yt-dlp">yt-dlp</a> installed in your environment.</p>
<p>Once you open your <a href="https://www.youtube.com/playlist?list=WL">&quot;Watch Later&quot;</a> page, open the DevTools console and extract all the urls using the snippet below. It will find all the videos present on the current page, and for each of them get the <code>href</code> attribute, which points directly to the video itself.</p>
<p>We will also quote all the values and join them with a newline, so it's easier to quickly copy the result directly, without any manual modifications.</p>
<pre><code class="language-js">const videoElements = Array.from(
  document
    .querySelector(&quot;ytd-playlist-video-list-renderer&quot;)
    .querySelectorAll(&quot;ytd-playlist-video-renderer&quot;)
);

const links = videoElements
  .map((el) =&gt; `&quot;${el.querySelector(&quot;a&quot;).href}&quot;`)
  .join(&quot;\n&quot;);

console.log(links);
</code></pre>
<p>Not that we have all the data, we create a <code>download.sh</code> file in the desired directory and fill it with values in an appropriate place.</p>
<pre><code class="language-sh">videos=(
    # newline separated list of links
    &quot;https://www.youtube.com/watch?v=vxKBHX9Datw&amp;list=WL&amp;index=1&quot;
    &quot;https://www.youtube.com/watch?v=Q-WHRJPlL5g&amp;list=WL&amp;index=2&quot;
    &quot;https://www.youtube.com/watch?v=dQw4w9WgXcQ&amp;list=WL&amp;index=3&quot;
)

for video in ${videos[@]}
do
  yt-dlp \
    --format 'bestvideo[ext=mp4][height&lt;=720]+bestaudio[ext=m4a]/best[ext=mp4][height&lt;=720]/best' \
    --no-playlist \
    --sponsorblock-remove default \
    $video
done
</code></pre>
<p>The script will iterate through all the videos, one by one, and feed them to the <code>yt-dlp</code>.</p>
<p>To quickly summarize what the flags mean.</p>
<ul>
<li><code>--format</code> - file format parameters.</li>
<li><code>bestvideo[ext=mp4][height&lt;=720]+bestaudio[ext=m4a]</code> - download the highest quality of <code>mp4</code> format, with <code>m4a</code> audio format, but not larger than <code>720p</code></li>
<li><code>best[ext=mp4][height&lt;=720]</code> - if not possible, download the highest quality of <code>mp4</code> format, but not larger than <code>720p</code></li>
<li><code>best</code> - if not possible, fallback to whatever the best quality is available</li>
<li><code>--no-playlist</code> - do not attempt to fetch the next video in the playlist, as we provide the data ourselves, and the playlist is not public anyway (it looks at <code>list</code> query parameter, which is present by default in our extracted URLs, thus we'd get some noise)</li>
<li><code>--sponsorblock-remove default</code> - use <a href="https://github.com/ajayyy/SponsorBlock">ajayyy/SponsorBlock</a> API to automatically remove some parts of the videos, that are sponsored, fillers, interactions reminders etc. By default it will remove all possible chapters</li>
</ul>
<p>Once everything is set, we can either give the saved script executable permission with <code>chmod +x download.sh</code> and run it as <code>./download.sh</code>. Or we can run it directly using <code>sh ./download.sh</code>.</p>
<p>That's it. Now everything should be available locally, and you can happily spend your downtime binging that sweet, sweet YouTube content.</p>
]]>
      </content:encoded>
      <pubDate>Wed, 19 Oct 2022 00:00:00 GMT</pubDate>
    </item>
    <item>
      <title>Introducing: Sentry's Unified Go SDK</title>
      <link>https://kamilogorek.com/blog/sentry-go-sdk/</link>
      <guid isPermaLink="false">https://kamilogorek.com/blog/sentry-go-sdk/</guid>
      <description>
        According to Stack Overflow’s Developer Survey 2019, Go is the third most wanted language to learn, as well as the third-best paid technology in the field. It is not a surprise, as it is one of the languages used for writing critical parts of a lot of large systems. The language design and syntax are simple, but developing in Go is far from easy.
      </description>
      <content:encoded>
        <![CDATA[<p><em>Originally posted on <a href="https://blog.sentry.io/2019/08/15/introducing-sentrys-unified-go-sdk/">sentry.io</a></em></p>
<hr>
<p>According to <a href="https://insights.stackoverflow.com/survey/2019">Stack Overflow’s Developer Survey 2019</a>, <a href="https://golang.org/">Go</a> is the third most wanted language to learn, as well as the third-best paid technology in the field. It is not a surprise, as it is one of the languages used for writing critical parts of a lot of large systems. The language design and syntax are simple, but developing in Go is far from easy.</p>
<p>Some of the features Go provides:</p>
<ul>
<li>recovering from panic</li>
<li>reporting errors</li>
<li>recording breadcrumbs</li>
<li>logging messages</li>
<li>extracting stack traces from errors and panics</li>
<li>errors filtering</li>
<li>integration with various HTTP libraries</li>
<li>async/sync transports</li>
<li>serverless support</li>
<li>extracting request/os/device data</li>
<li>thread-safe data separation</li>
</ul>
<p>We decided to spend some time on writing a new, unified SDK, that supports all recent versions of the language, utilizes its features, and gives developers the most helpful hints possible for where and why the error might happen.</p>
<p>
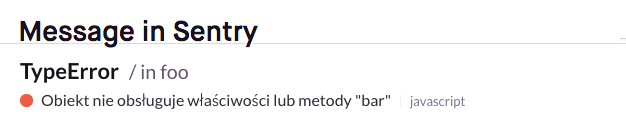
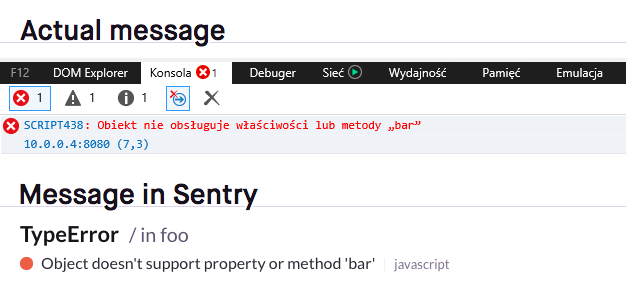
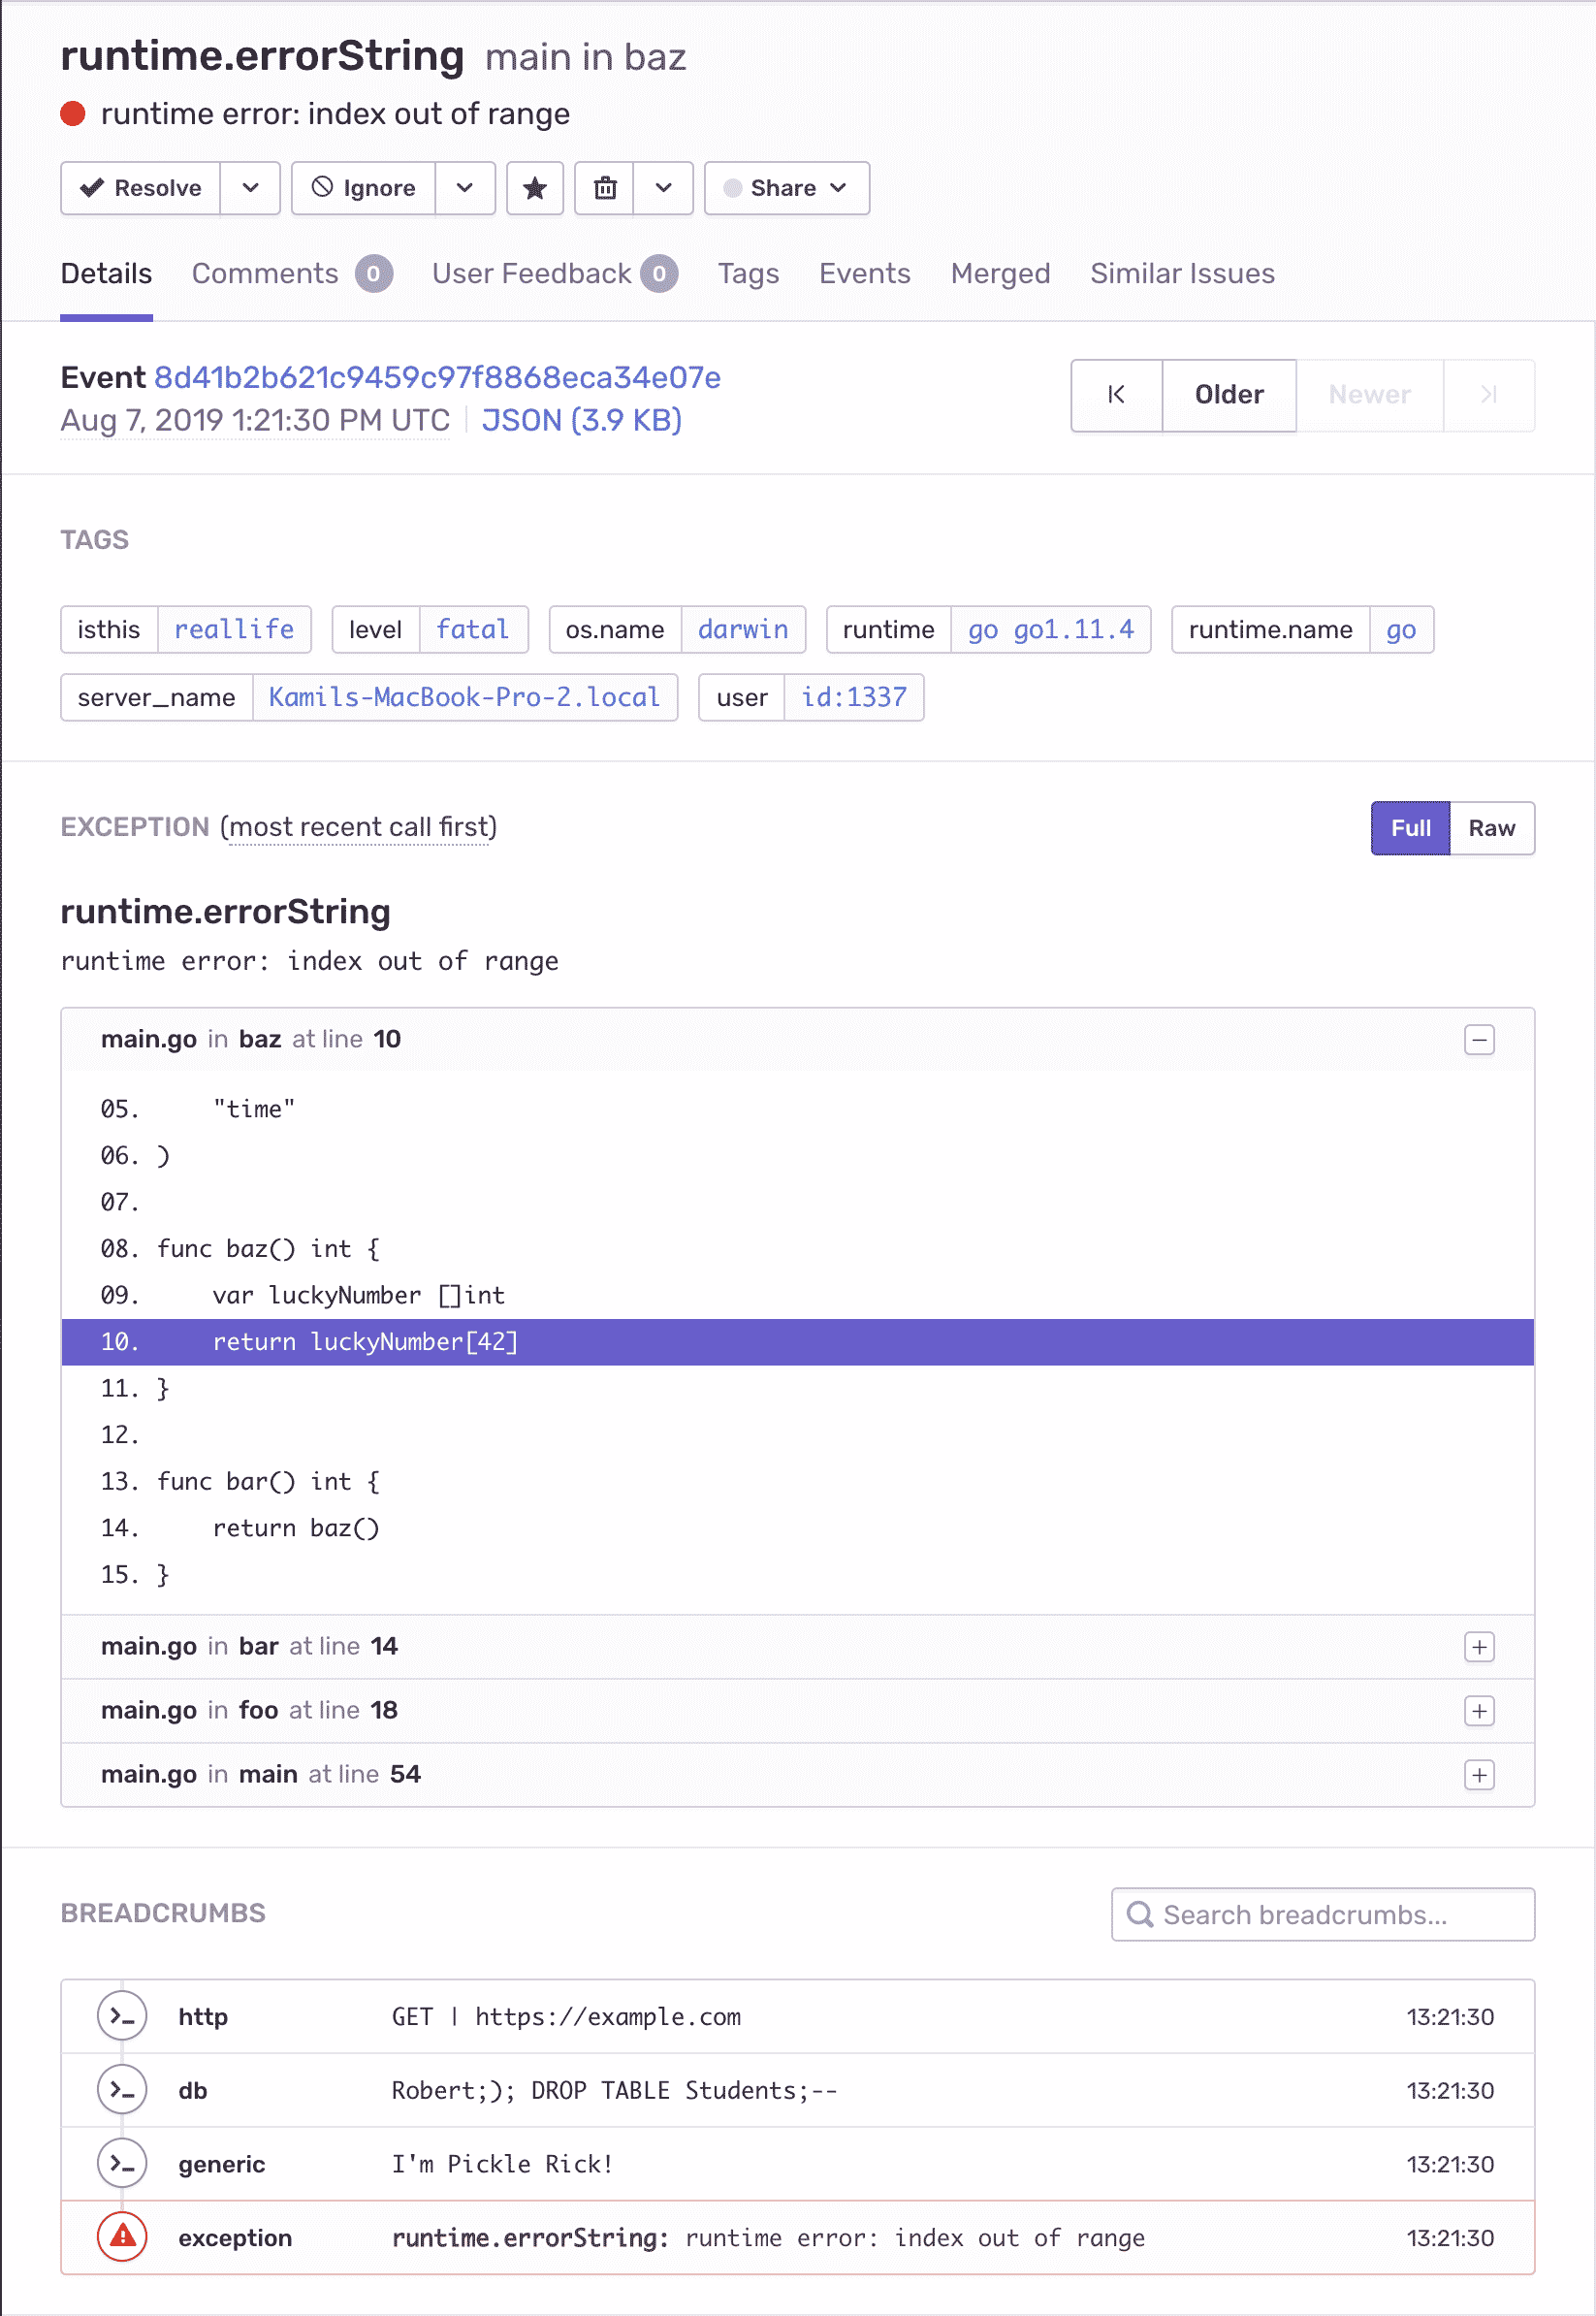
Here’s what a Go exception looks like in Sentry.</p>
<p><img src="https://kamilogorek.com/assets/images/blog/sentry-go-exception.png" alt="Sentry Go Exception"></p>
<hr>
<h2>Getting Started</h2>
<p><code>sentry-go</code> provides a Sentry client implementation, which is in-line with our <a href="https://docs.sentry.io/development/sdk-dev/unified-api/">Unified API guidelines</a> and is intended to replace the old <code>raven-go</code> package. The SDK supports Go Modules by design; therefore, when installed, it picks up the latest version of the SDK and stores it inside the <code>go.mod</code> file. Non-major changes should never break your builds.</p>
<pre><code class="language-sh">$ go get github.com/getsentry/sentry-go
</code></pre>
<p>The only thing you need to call to initialize the SDK is <code>sentry.Init</code> with a proper DSN obtained from your Sentry account.</p>
<pre><code class="language-go">sentry.Init(sentry.ClientOptions{
  Dsn: &quot;YOUR_PUBLIC_DSN&quot;,
})
</code></pre>
<p>Once configured, you can start using any publicly available API, and it’ll track your data and report captured errors.</p>
<p>Now, let’s go through some real-world use-cases, as this sounds way more interesting.</p>
<hr>
<h2>Capturing Panics</h2>
<p>Sentry provides two ways of recovering from panics: <code>RecoverWithContext()</code>, which can pass Context around, and <code>Recover()</code>, which does not pass <code>Context</code> around. Unless you are moving data around or using some cancel/timeout functionalities, <code>Recover()</code> is the way to go.</p>
<p>Below, we call a function that we know breaks by fetching a number from a slice that is definitely not there. How can we make sure that exception reports to Sentry? With <code>Recover()</code>, that’s how.</p>
<pre><code class="language-go">func bar() int {
  var luckyNumber []int
  return luckyNumber[42]
}

func foo() int {
  return bar()
}

func main() {
  // Initialize Sentry here

  defer sentry.Flush(time.Second * 5)
  defer sentry.Recover()

  foo()
}
</code></pre>
<p>By default, <code>sentry-go</code> uses asynchronous transport, which requires an explicit signal for event delivery finish using the <code>sentry.Flush</code> method. Otherwise, the program doesn’t wait for the async HTTP calls to return a response and exits the process immediately when reaching the end of the main function. <code>sentry.Flush</code> isn’t required inside a running <code>goroutine</code> or if you would use <code>HTTPSyncTransport</code>, which you can read about in our docs.</p>
<hr>
<h2>Capturing Errors</h2>
<p>Reporting errors is even easier, because in Go, “error is just a value.”</p>
<pre><code class="language-go">var ErrMissingLuckyNumber = errors.New(&quot;Missing lucky number, sorry&quot;)
var luckyNumbers = map[string]int{
  &quot;pickle&quot;: 42,
}

func getLuckyNumber(key string) (int, error) {
  if val, ok := luckyNumbers[key]; ok {
    return val, nil
  } else {
    return 0, ErrMissingLuckyNumber
  }
}

func main() {
  // Initialize Sentry here

  number, err := getLuckyNumber(&quot;pickle&quot;)

  if err != nil {
    sentry.CaptureException(err)
    sentry.Flush(time.Second * 5)
  } else {
    fmt.Println(&quot;Your lucky number is:&quot;, number)
  }
}
</code></pre>
<p>The same goes for simple messages.</p>
<pre><code class="language-go">// same getLuckyNumber implementation

func main() {
  // Initialize Sentry here

  if _, err := getLuckyNumber(&quot;pickle&quot;); err != nil {
    sentry.CaptureMessage(&quot;Lucky number wasn't there, but let just log it as a message and proceed&quot;)
  }

  // the rest of your  program
}
</code></pre>
<hr>
<h2>Breadcrumbs</h2>
<p>Breadcrumbs are a small message-hints that help track what went wrong during program execution, including some HTTP call, a DB query, data parsing, you name it.</p>
<p>Let’s simulate the scenario:</p>
<pre><code class="language-go">func performHTTPRequest(url string) string {
  sentry.AddBreadcrumb(&amp;sentry.Breadcrumb{
    Message:  fmt.Sprintf(&quot;GET | %s&quot;, url),
    Category: &quot;http&quot;,
  })

  // performing HTTP request
  return &quot;I'm Pickle Rick!&quot;
}

func performDBQuery(query string) string {
  sentry.AddBreadcrumb(&amp;sentry.Breadcrumb{
    Message:  query,
    Category: &quot;db&quot;,
  })

  // performing DB query
  return &quot;https://example/com&quot;
}

func processData(data string) error {
  return errors.New(&quot;something broke, sorry&quot;)
}

func main() {
  // Initialize Sentry here

  url := performDBQuery(&quot;Robert;); DROP TABLE Students;--&quot;)

  if data := performHTTPRequest(url); data != &quot;&quot; {
    sentry.AddBreadcrumb(&amp;sentry.Breadcrumb{
      Message: data,
    })

    if err := processData(data); err != nil {
      sentry.CaptureException(err)
    }
  }
}
</code></pre>
<p>With this setup, your error has three beautiful breadcrumbs that look exactly like the on the screenshot in the very top of this blog post.</p>
<hr>
<h2>Contextual Data</h2>
<p>Now and then, it’s useful to correlate some additional data with a captured panic or error. To do this, we also provide two methods: one that stores the data in the global <code>Scope</code> object and attaches it to every following event, and one that does this only for events captured in its callback function.</p>
<pre><code class="language-go">func main() {
  // This data will be attached to every event sent to Sentry
  sentry.ConfigureScope(func(scope *sentry.Scope) {
    scope.SetTag(&quot;isthis&quot;, &quot;reallife&quot;)
    scope.SetExtra(&quot;oristhis&quot;, &quot;justfantasy&quot;)
    scope.SetUser(sentry.User{
      ID: &quot;1337&quot;,
    })
  })

  // For example this one
  sentry.CaptureMessage(&quot;hey there!&quot;)

  // However, this data will be only attached to the events that are captured inside it's callback
  // it'll contain global data configure above and its own &quot;internal&quot; one
  sentry.WithScope(func(scope *sentry.Scope) {
    scope.SetExtra(&quot;caught&quot;, &quot;inalandslide&quot;)
    sentry.CaptureMessage(&quot;no escape from reality!&quot;)
  })

  // And this one
  sentry.CaptureMessage(&quot;hey there too!&quot;)
}
</code></pre>
<hr>
<h2>Goroutines</h2>
<p>Capturing panics and errors, breadcrumbs, and contextual data are all well and good, but what about <code>goroutines</code>? No worries — we’ve got you covered.</p>
<p>The only thing you have to remember is that, in threaded environments, you have to take care of the data that’s living inside it, be it <code>Scope</code> instance or the <code>Client</code> you configure with <code>sentry.Init</code>. Thankfully, <code>Hub</code> keeps track of corresponding <code>Scope</code> and <code>Client</code>, allowing them to communicate with each other.</p>
<p>One of the methods that <code>Hub</code> uses is <code>Clone</code>, which (as you can guess) clones the top-most scope on the stack and reassigns the pre-configured client. <code>Clone</code> enables calls all major public APIs, but in a completely separated manner, where you don’t have to worry about overriding your scope data or race-conditions.</p>
<p>Here’s how:</p>
<pre><code class="language-go">func main() {
  // Initialize Sentry here

  go func() {
    localHub := sentry.CurrentHub().Clone()
    localHub.ConfigureScope(func(scope *sentry.Scope) {
      scope.SetTag(&quot;secretTag&quot;, &quot;go#1&quot;)
    })
    localHub.CaptureMessage(&quot;Hello from Goroutine! #1&quot;)
  }()

  go func() {
    localHub := sentry.CurrentHub().Clone()
    localHub.ConfigureScope(func(scope *sentry.Scope) {
      scope.SetTag(&quot;secretTag&quot;, &quot;go#2&quot;)
    })
    localHub.CaptureMessage(&quot;Hello from Goroutine! #2&quot;)
  }()
}
</code></pre>
<p><code>Hub</code> and <code>Clone</code> make sure that the data belongs where it needs to and that captured events are enhanced in a correct way.</p>
<hr>
<h2>HTTP Packages</h2>
<p>Our Go SDK provides integration with a variety of HTTP libraries: net/HTTP, Echo, FastHTTP, Iris, Gin, Martini, Negroni, and the list is still growing. Every integration automatically captures panics for your request handlers and exposes <code>Request</code> object for your disposal.</p>
<p>Let’s see how one may use it with one of the most popular packages, <code>gin</code>:</p>
<pre><code class="language-go">package main

import (
  &quot;fmt&quot;
  &quot;net/http&quot;

  &quot;github.com/getsentry/sentry-go&quot;
  sentrygin &quot;github.com/getsentry/sentry-go/gin&quot;
  &quot;github.com/gin-gonic/gin&quot;
)

func main() {
  sentry.Init(sentry.ClientOptions{
    Dsn: &quot;YOUR_PUBLIC_DSN&quot;,
    AttachStacktrace: true,
  })

  app := gin.Default()

  // Gin has its own Panic handle, which sends 500 to the user
  // therefore after catching and reporting it to Sentry, we hand it over further
  app.Use(sentrygin.New(sentrygin.Options{
    Repanic: true,
  }))

  // Add some contextual data, that can be extracted from the request
  app.Use(func(ctx *gin.Context) {
    if hub := sentrygin.GetHubFromContext(ctx); hub != nil {
      hub.Scope().SetTag(&quot;someRandomTag&quot;, &quot;maybeYouNeedIt&quot;)
    }
    ctx.Next()
  })

  app.GET(&quot;/&quot;, func(ctx *gin.Context) {
    // Use a Hub that is stored on the request's context (added by Sentry's integration)
    // And capture a message that will inform us about some unusual behavior,
    // despite request not panicking
    if hub := sentrygin.GetHubFromContext(ctx); hub != nil {
      hub.WithScope(func(scope *sentry.Scope) {
        scope.SetExtra(&quot;unwantedQuery&quot;, &quot;someQueryDataMaybe&quot;)
        hub.CaptureMessage(&quot;User provided unwanted query string, but we recovered just fine&quot;)
      })
    }

    ctx.Status(http.StatusOK)
  })

  app.GET(&quot;/foo&quot;, func(ctx *gin.Context) {
    // sentrygin handler will catch it just fine, and because we attached &quot;someRandomTag&quot;
    // in the middleware before, it will be sent through as well
    panic(&quot;y tho&quot;)
  })

  _ = app.Run(&quot;:3000&quot;)
}
</code></pre>
<p>Note the <code>AttachStacktrace</code> client option that ensures, despite <code>panic</code> throwing just a <code>string</code> our way, we can extract the stack trace and add more context to the Sentry event report page.</p>
<hr>
<h2>What’s next?</h2>
<p>Right now <code>sentry-go</code> is in it’s “pre-v1” stage. The SDK has a stable API that we test in the wild, but we look for ways to make it better (including listening to feedback). We already have some ideas that you can track in our GitHub issues page.</p>
<p>If you’d like to request a feature, help with implementing a feature, or have a better way of solving problems, feel free to <a href="https://github.com/getsentry/sentry-go/issues">let us know</a>, and we’ll make sure that your voice is heard!</p>
]]>
      </content:encoded>
      <pubDate>Thu, 15 Aug 2019 00:00:00 GMT</pubDate>
    </item>
    <item>
      <title>Debug Your Node.js Projects With Source Maps</title>
      <link>https://kamilogorek.com/blog/sentry-node-sourcemaps/</link>
      <guid isPermaLink="false">https://kamilogorek.com/blog/sentry-node-sourcemaps/</guid>
      <description>
        As you probably know, source maps allow you to view source code context obtained from stack traces in their original, untransformed form. This view is particularly useful when attempting to debug minified code (like UglifyJS) or transpiled code (like TypeScript or ES6). We’ve made the analogy before, but source maps act as the decoder ring to your secret (minified or transpiled) code. As of recently, we support source maps for Node.js projects. Here’s what you need to know to generate and make those source maps available for Sentry.
      </description>
      <content:encoded>
        <![CDATA[<p><em>Originally posted on <a href="https://blog.sentry.io/2019/02/20/debug-node-source-maps/">sentry.io</a></em></p>
<hr>
<p>As you probably know, source maps allow you to view source code context obtained from stack traces in their original, untransformed form. This view is particularly useful when attempting to debug minified code (like UglifyJS) or transpiled code (like TypeScript or ES6). We’ve <a href="https://blog.sentry.io/2018/10/18/4-reasons-why-your-source-maps-are-broken">made the analogy before</a>, but source maps act as the decoder ring to your secret (minified or transpiled) code.</p>
<p>As of recently, we support <a href="https://docs.sentry.io/platforms/node/sourcemaps/">source maps for Node.js</a> projects. Here’s what you need to know to generate and make those source maps available for Sentry.</p>
<hr>
<h2>Generating a source map</h2>
<p>Most modern JavaScript transpilers support source maps. Below are instructions for two common tools: Webpack and Rollup.</p>
<p><strong>Webpack</strong></p>
<p>Webpack is a powerful build tool that resolves and bundles your JavaScript modules into larger chunks or a single file. It also supports many different “loaders” which can convert different flavors, like TypeScript, into plain JavaScript.</p>
<p>Webpack can be configured to output source maps by editing <code>webpack.config.js</code>.</p>
<pre><code class="language-js">const path = require(&quot;path&quot;);
module.exports = {
  entry: &quot;./src/app.js&quot;,
  output: {
    path: path.resolve(__dirname, &quot;dist&quot;),
    filename: &quot;bundle.js&quot;,
  },
  target: &quot;node&quot;,
  devtool: &quot;source-map&quot;,
};
</code></pre>
<p><strong>Rollup</strong></p>
<p>Rollup, another powerful bundler, is specifically focused on compiling small pieces of code into a larger structure, like a library. As an added benefit, Rollup is great at <a href="https://developer.mozilla.org/en-US/docs/Glossary/Tree_shaking">tree shaking</a>, right out of the box.</p>
<p>Rollup can be configured to output source maps by editing <code>rollup.config.js</code>.</p>
<pre><code class="language-js">export default {
  entry: &quot;./src/app.js&quot;,
  output: {
    file: &quot;bundle.js&quot;,
    format: &quot;cjs&quot;,
    sourceMap: true,
  },
};
</code></pre>
<hr>
<h2>Making source maps available to Sentry</h2>
<p>Once the source maps for Node.js projects are generated, you can upload them directly to Sentry.</p>
<p><strong>Uploading source maps to Sentry</strong></p>
<p>Sentry provides an abstraction called Releases that is used to improve our error reporting abilities by correlating first seen events with the release that might have introduce the problem. Releases are necessary for source maps, and the Release API allows storage of source maps within Sentry.</p>
<p>Attaching source artifacts can be done with the help of the <code>sentry-webpack-plugin</code>, which internally uses our Sentry CLI, and these five steps:</p>
<ol>
<li>Create a new authentication token under <em>[Account] &gt; API</em>.</li>
<li>Select <code>project:write</code> under Scopes.</li>
<li>Install <code>@sentry/webpack-plugin</code> using <code>npm</code>.</li>
<li>Create <code>.sentryclirc</code> file with necessary config (see <a href="https://github.com/getsentry/sentry-webpack-plugin">Sentry Webpack Plugin</a> docs).</li>
<li>Update your <code>webpack.config.json</code>.</li>
</ol>
<p><em>For more information on how to configure the plugin, check out the <a href="https://github.com/getsentry/sentry-webpack-plugin">Sentry Webpack Plugin</a> documentation.</em></p>
<pre><code class="language-js">const SentryPlugin = require(&quot;@sentry/webpack-plugin&quot;);
module.exports = {
  // ... other config above ...
  plugins: [
    new SentryPlugin({
      release: process.env.RELEASE,
      include: &quot;./dist&quot;,
    }),
  ],
};
</code></pre>
<p>You’ll also need to configure the client to send the <code>release</code>:</p>
<pre><code class="language-js">Sentry.init({
  dsn: &quot;https://e6c75451eb1344d9865ac11985f46946@sentry.io/1274678&quot;,
  release: process.env.RELEASE,
});
</code></pre>
<p>If you use <code>process.env.RELEASE</code> in your application’s code, you’ll have to provide that environment variable every time you run the app. Using Webpack, it’s much more suitable to use <a href="https://webpack.js.org/plugins/define-plugin/">DefinePlugin</a> and “embed” it during build time.</p>
<p>In that case, the code for <code>webpack.config.js</code> is:</p>
<pre><code class="language-js">const webpack = require(&quot;webpack&quot;);
// later in the config object, alongside sentry-webpack-plugin

plugins: [
  new webpack.DefinePlugin({
    &quot;process.env.RELEASE&quot;: process.env.RELEASE,
  }),
];
</code></pre>
<p>You don’t <em>have</em> to use <code>RELEASE</code> environment variables, but <code>release</code> from your upload needs to match <code>release</code> from your <code>init</code> call.</p>
<p><em>For more information, check out the <a href="https://docs.sentry.io/api/releases/">Releases API</a> documentation.</em></p>
<p><strong>Updating Sentry SDK configuration to support source maps</strong></p>
<p>For Sentry to understand how to resolve errors, the data we send needs to be modified. You can update the Sentry SDK with the help of our <a href="https://docs.sentry.io/platforms/javascript/pluggable-integrations/#rewriteframes">RewriteFrames</a> integration, which modifies that data for you.</p>
<pre><code class="language-js">Sentry.init({
  dsn: &quot;https://e6c75451eb1344d9865ac11985f46946@sentry.io/1274678&quot;,
  integrations: [new Sentry.Integrations.RewriteFrames()],
});
</code></pre>
<p>This config assumes that you’ll bundle your application into a single file, which will be served and then uploaded to Sentry from the root of the project’s directory.</p>
<p>If you’re not doing this, because perhaps you’re using TypeScript and uploading your compiled files to the server separately, then we need to use a different approach. This different approach is outside the scope of the current post, but you’ll find some helpful hints and a details example over in our <a href="https://docs.sentry.io/platforms/node/typescript/">TypeScript</a> documentation.</p>
<hr>
<p>That’s it! Use it. Break things. Repair them. Break them some more. Repair them again. Break them one more time. Repair — you get the idea.</p>
<p>Post feedback in our <a href="https://forum.sentry.io/">forum</a> or <a href="https://github.com/getsentry/sentry-javascript/issues">issue tracker</a>, or <a href="https://sentry.io/contact/support/">shout out</a> to our support engineers for help. And, of course, don’t forget to check out the <a href="https://docs.sentry.io/platforms/node/sourcemaps/">source maps for Node.js</a> documentation.</p>
]]>
      </content:encoded>
      <pubDate>Wed, 20 Feb 2019 00:00:00 GMT</pubDate>
    </item>
    <item>
      <title>Sentry Now Translates Errors From Edge and IE</title>
      <link>https://kamilogorek.com/blog/sentry-errors-translated/</link>
      <guid isPermaLink="false">https://kamilogorek.com/blog/sentry-errors-translated/</guid>
      <description>
        Internet Explorer and Edge throw errors in the end user’s language. If your end user speaks Polish, they throw a Polish language error. If your end user speaks French, they throw a French language error. If your end user speaks German they throw a Spanish language error, but only if that end user accidentally set their Windows language to Spanish and they aren’t sure how to fix it; otherwise the error is in German.
      </description>
      <content:encoded>
        <![CDATA[<p><em>Originally posted on <a href="https://blog.sentry.io/2018/02/28/internet-explorer-translations/">sentry.io</a></em></p>
<hr>
<p>Internet Explorer and Edge throw errors in the end user’s language. If your end user speaks Polish, they throw a Polish language error. If your end user speaks French, they throw a French language error. If your end user speaks German they throw a Spanish language error, but only if that end user accidentally set their Windows language to Spanish and they aren’t sure how to fix it; otherwise the error is in German.</p>
<p>Now, if both you and your end user are Brazilian, seeing the error in Portuguese is not unhelpful.</p>
<p><img src="https://kamilogorek.com/assets/images/blog/polish-error.png" alt="Selenium Graph"></p>
<p><em>An error in Polish, not Portuguese, but you get the point</em></p>
<p>The problem is that:</p>
<ul>
<li>No other browser does this. Chrome, Firefox, and Safari all throw errors in English.</li>
<li>You’re very likely to have users who speak a wide variety of languages, which means you’re almost certainly going to end up with plenty of individual errors that each appear to be multiple different errors.</li>
</ul>
<p>So if you had the same IE issue in 20 different countries, you’d end up with 20 different error messages. Though Sentry would still use the stack trace to group all these errors into a single Issue, the variety of messages could make it more difficult to measure an issue’s impact and severity, and then to appropriately resolve it once you’ve managed to do so. We’ve experienced this problem ourselves, puzzling over errors thrown in languages we don’t speak.</p>
<p>Which is exactly why Sentry now automatically translates Edge and IE errors to English.</p>
<p>How do we do that?</p>
<p>We have a large, indexed dictionary of almost every error across all IE supported languages (taken from this open-sourced <a href="https://github.com/errorception/ie-error-languages">dataset</a>). Once the error is extracted from the client, we look over each frame of the stack trace to ensure it’s actually an error and not a custom message created by you, since a custom message wouldn’t be easily translatable.</p>
<p>We have the message. We have our dictionary. Now we can check to see if there’s a match somewhere. Let’s say we have an IE error in Spanish and it’s indexed in the dictionary as IE error number 962. We can then grab the number 962 message in English and create a regex that parses out the placeholders, like “There’s been an error [something here] with a value of [something else here] and yada yada yada.”</p>
<p><img src="https://kamilogorek.com/assets/images/blog/translated-error.png" alt="Translated Error"></p>
<p><em>A translated error</em></p>
<p>And that’s pretty much that. Now most errors thrown in Edge or IE across ten languages will appear to you as one error in one language, making the problem easier to tackle.</p>
<p>Have questions? Don’t hesitate to reach out to our <a href="https://sentry.io/contact/support/">support engineers</a>. They’re here to help. And also to code. But mostly to help.</p>
]]>
      </content:encoded>
      <pubDate>Wed, 28 Feb 2018 00:00:00 GMT</pubDate>
    </item>
    <item>
      <title>npm Scripts: Tips Everyone Should Know</title>
      <link>https://kamilogorek.com/blog/npm-scripts-tips/</link>
      <guid isPermaLink="false">https://kamilogorek.com/blog/npm-scripts-tips/</guid>
      <description>
        npm is not only the package manager for JavaScript, it's also used to set up tooling around your codebase. Linters, transpilers, testing, and servers. Everything can be configured and run using the very same thing. Basic usage is really simple, too.
      </description>
      <content:encoded>
        <![CDATA[<p><em>Originally posted on <a href="http://corgibytes.com/blog/2017/04/18/npm-tips/">corgibytes.com</a></em></p>
<hr>
<p>npm is not only the package manager for JavaScript, it's also <a href="https://docs.npmjs.com/misc/scripts">used to set up tooling around your codebase</a>. Linters, transpilers, testing, and servers. Everything can be configured and run using the very same thing. Basic usage is really simple, too.</p>
<p>You specify your scripts within the <code>scripts</code> attribute of the main object in <code>package.json</code> and then run it using <code>npm run &lt;name&gt;</code>.</p>
<p>For example:</p>
<pre><code class="language-json">{
  ...
  &quot;scripts&quot;: {
    &quot;build&quot;: &quot;webpack --progress&quot;,
    &quot;test&quot;: &quot;karma start&quot;,
    &quot;server&quot;: &quot;webpack-dev-server&quot;
  }
  ...
}
</code></pre>
<p>There are, however, some details that may be useful while performing your setup.</p>
<hr>
<h2>Running Scripts with Additional Arguments</h2>
<p>Let's say that you want to run Karma, which by default is watching all of your files for changes, without this feature.</p>
<p>To do this, they provide a <code>--single-run</code> flag that can be used with their script.</p>
<p>The simplest way to achieve this would be to add a new entry in our scripts.</p>
<p>For example:</p>
<p><code>&quot;test:single-run&quot;: &quot;karma start --single-run&quot;</code></p>
<p>If we'd like to modify our default test parameters, however, we'd have to do this in both places, <code>test</code> and <code>test:single-run</code>.</p>
<p>Or we can go around this issue by using our flag directly from the command line.</p>
<p>To achieve this, we use <code>--</code> at the end of our command, which tells npm that anything after this should be appended directly to the command itself.</p>
<pre><code class="language-sh">$ npm run test -- --single-run
</code></pre>
<hr>
<h2>Running Multiple Commands in Series or in Parallel</h2>
<p>If you have one script that runs multiple commands, let's say CSS linter, JS linter and HTML linter, it'd be nice to run them all at once to speed things up.</p>
<p>If you have commands that are dependent on each other, however, like if you run transpiler before running the tests, you'll want to change the execution flow to be one after another, not all at once.</p>
<p>Because <code>npm</code> scripts are spawning a shell process under the hood, we can use its syntax to achieve what we need. Specifically <code>;</code> (and <code>&amp;&amp;</code>, more on this next) for running in series and <code>&amp;</code> for running in parallel.</p>
<p>An example using this syntax could look something like this:</p>
<p>Parallel:</p>
<pre><code class="language-json">&quot;lint&quot;: &quot;eslint &amp; csslint &amp; htmllint&quot;
</code></pre>
<p>Series:</p>
<pre><code class="language-json">&quot;build&quot;: &quot;babel; jest&quot;
</code></pre>
<p>(I know, Jest test runner has a built-in functionality to precompile your code. It's only an example ;))</p>
<p>It will work just fine, but there's one rather huge issue with this approach. <code>&amp;</code> syntax creates a subprocess, which results in the original <code>npm</code> process not being able to tell whether it already finishes or not. This can be problematic, especially with long running scripts.</p>
<p>To make things more coherent, we can use a package called <a href="https://www.npmjs.com/package/npm-run-all">npm-run-all</a>. It provides additional commands, more specifically <code>run-s</code> for series and <code>run-p</code> for parallel, and it will handle all of the subprocesses correctly.</p>
<p>Parallel:</p>
<pre><code class="language-json">&quot;lint&quot;: &quot;run-p eslint csslint htmllint&quot;
</code></pre>
<p>Series:</p>
<pre><code class="language-json">&quot;build&quot;: &quot;run-s babel jest&quot;
</code></pre>
<hr>
<h2>Bailing out When a Command Fails</h2>
<p>In our previous example, we run transpiler before we run our tests.</p>
<p>But what's the point of running the tests if transpilation failed in the first place?</p>
<p><code>;</code> syntax waits until the former command finishes and then runs the next one, no matter what the exit code.</p>
<p>What we'd like to do instead is to stop the execution if any command in series failed.</p>
<p>To change this, we simply use <code>&amp;&amp;</code> instead of <code>;</code>:</p>
<pre><code class="language-json">&quot;build&quot;: &quot;babel &amp;&amp; jest&quot;
</code></pre>
<p>Now, if <code>babel</code> exits with a code other than <code>0</code>, which means a successful command run, <code>jest</code> will never run.</p>
<p>We can, of course, chain this syntax as many times as we want:</p>
<pre><code class="language-json">&quot;build&quot;: &quot;eslint &amp;&amp; babel &amp;&amp; jest &amp;&amp; deploy&quot;
</code></pre>
<hr>
<h2>Using Life-Cycle Hooks</h2>
<p>Every script in npm runs three separate scripts under the hood. A <code>pre</code> script, a script itself and a <code>post</code> script. Those two additional scripts are run, as their names imply, before and after the main script.</p>
<p>They are useful for setting up and cleaning up, for example, during deployment.</p>
<p>Both of those scripts can be written using <code>pre&lt;script-name&gt;</code> and <code>post&lt;script-name&gt;</code> in the same <code>scripts</code> object as before.</p>
<p>Let's say that we want to build our project, it'll be a very simple example just to show the concept.</p>
<p>What we'll do is this:</p>
<ul>
<li>create a new one <code>dist</code> directory and remove everything from it if there was already one</li>
<li>create <code>tmp</code> directory</li>
<li>build the project to <code>tmp</code> directory</li>
<li>minify our bundle to <code>dist</code> directory</li>
<li>remove the <code>tmp</code> directory</li>
</ul>
<pre><code class="language-json">&quot;prebuild&quot;: &quot;mkdir dist tmp; rm -rf dist/*&quot;,
&quot;build&quot;: &quot;browserify main.js -o tmp/bundle.js &amp;&amp; uglifyjs -o dist/bundle.min.js -- tmp/bundle.js&quot;,
&quot;postbuild&quot;: &quot;rm -rf tmp&quot;
</code></pre>
<p>Note that you should use the <code>rimraf</code> package for cross-platform compatibility, as it won't work on Windows.</p>
<p>Now, whenever you run <code>npm run build</code>, it will trigger all the commands, making sure they were called in a correct order.</p>
<hr>
<h2>Running Group of Commands</h2>
<p>The naming convention in npm uses a colon to group a whole set of specific tasks. In one of the code examples above, we run all lint tasks in parallel using <code>&amp;</code> syntax.</p>
<p>What I often like to do is split those tasks into smaller chunks and run them as groups using the <code>npm run</code> command within the script itself.</p>
<p>Our previous example looked like this:</p>
<pre><code class="language-json">&quot;lint&quot;: &quot;eslint &amp; csslint &amp; htmllint&quot;
</code></pre>
<p>What we can do is separate every single one of them (in case we need to add some flags to configure them, for example) and group them together.</p>
<pre><code class="language-json">&quot;lint: &quot;npm run lint:js &amp; npm run lint:css &amp; npm run lint:html&quot;,
&quot;lint:js&quot;: &quot;eslint --some-flag&quot;,
&quot;lint:css&quot;: &quot;csslint --that-will-change&quot;,
&quot;lint:html&quot;: &quot;htmllint --how-things-work&quot;
</code></pre>
<p>After this change, it will work exactly the same way, but now we can run either all of them at once, or each one separately whenever we need.</p>
<p>To make it even cleaner, we could use an <code>npm-run-all</code> here again and change our main <code>lint</code> command to <code>npm-run-all lint:*</code>, which would then match all scripts starting with the <code>lint:</code> group.</p>
<hr>
<h2>npm Completion</h2>
<p>One of the things I learned recently is that npm itself provides us with a baked-in way to <a href="https://docs.npmjs.com/cli/completion">add commands completion in the terminal</a>. And what's even better is that it will also include all of your custom scripts!</p>
<p>Depending on your environment (bash or zsh), you just pipe the result of your <code>npm completion</code> command directly to <code>~/.bashrc</code> or <code>~/.zshrc</code>. Remember to reload this file afterwards using <code>source ~/.bashrc</code>!</p>
<pre><code class="language-sh">$ npm completion &gt;&gt; ~/.bashrc
$ npm completion &gt;&gt; ~/.zshrc
</code></pre>
<hr>
<h2>Writing Custom Checks for Your npm Scripts</h2>
<p>Thanks to the <code>&amp;&amp;</code> syntax and npm understanding regular exit codes as described above, we can write very simple node scripts that will do some initial checks for us.</p>
<p>For example, making sure that the user specified all of the required ENV variables or that the command name doesn't contain any typos when trying to run it.</p>
<p>What I used recently, is this nodel.js script verifying that I have <code>NODE_ENV</code> set up and that developers are using one of the predefined env-specific scripts.</p>
<p>My scripts look something like this:</p>
<pre><code class="language-json">&quot;build&quot;: &quot;node ./scripts/env-check.js &amp;&amp; rimraf dist &amp;&amp; webpack --bail --progress --profile --display-error-details&quot;,
&quot;build:development&quot;: &quot;NODE_ENV=development npm run build&quot;,
&quot;build:staging&quot;: &quot;NODE_ENV=staging npm run build&quot;,
&quot;build:production&quot;: &quot;NODE_ENV=production npm run build&quot;,
</code></pre>
<p>And <code>env-check.js</code> content:</p>
<pre><code class="language-js">const task = process.env.npm_lifecycle_event;
const packageJSON = require(&quot;../package.json&quot;);
const availableEnvironments = Object.keys(packageJSON.scripts)
  .filter((key) =&gt; key.startsWith(task))
  .map((key) =&gt; key.split(&quot;:&quot;)[1])
  .filter((key) =&gt; key);

if (!process.env.NODE_ENV) {
  console.error(
    `[ Error ] NODE_ENV is required. Use ${task}:${availableEnvironments.join(
      &quot;/&quot;
    )} scripts instead.`
  );
  process.exit(1);
}

if (!availableEnvironments.includes(env)) {
  console.error(
    `[ Error ] ${env} is not valid NODE_ENV. Use ${task}:${availableEnvironments.join(
      &quot;/&quot;
    )} scripts instead.`
  );
  process.exit(1);
}

process.exit(0);
</code></pre>
<p>Now, whenever a developer types <code>npm run build</code> directly, this prompt will show up:</p>
<pre><code class="language-sh">$ [ Error ] NODE_ENV is required. Use build:development/staging/production scripts instead.
</code></pre>
<p>One drawback of the code above is that it won't understand <code>pre</code> script, which seems like a perfect place for this check:</p>
<pre><code class="language-json">&quot;prebuild&quot;: &quot;node ./scripts/env-check.js &amp;&amp; rimraf dist&quot;,
&quot;build&quot;: &quot;webpack --bail --progress --profile --display-error-details&quot;,
</code></pre>
<p>To fix this, we'll have to update the <code>task</code> variable, as <code>process.env.npm_lifecycle_event</code> won't return a <code>build</code> name, but rather <code>prebuild</code>.</p>
<pre><code class="language-js">const task = process.env.npm_lifecycle_event.startsWith(&quot;pre&quot;)
  ? process.env.npm_lifecycle_event.slice(3)
  : process.env.npm_lifecycle_event;
</code></pre>
<p>Now, we can place <code>node ./scripts/env-check.js</code> in any <code>pre</code> script, and it will perform all of those initial checks for us.</p>
<p>I personally use it for build, server and deploy scripts, but it can certainly be effectively used in many more places.</p>
]]>
      </content:encoded>
      <pubDate>Tue, 18 Apr 2017 00:00:00 GMT</pubDate>
    </item>
    <item>
      <title>Integration Tests Can Be Fun!</title>
      <link>https://kamilogorek.com/blog/integration-tests-fun/</link>
      <guid isPermaLink="false">https://kamilogorek.com/blog/integration-tests-fun/</guid>
      <description>
        One of the most mundane and frightening tasks for many developers is writing integration tests. It's a time-consuming, fragile, and often difficult and frustrating task to accomplish. What makes it even worse is that it quickly gets out of hand and breaks often, which leads to frustration and dropping the idea completely.
      </description>
      <content:encoded>
        <![CDATA[<p><em>Originally posted on <a href="http://corgibytes.com/blog/2017/02/21/integration-tests-fun/">corgibytes.com</a></em></p>
<hr>
<p>One of the most mundane and frightening tasks for many developers is writing integration tests. It's a time-consuming, fragile, and often difficult and frustrating task to accomplish. What makes it even worse is that it quickly gets out of hand and breaks often, which leads to frustration and dropping the idea completely.</p>
<p>What's the worst thing about writing integration tests? DOM? Promises? Asynchronicity? Some strange framework API behavior? I'd say: all of them.</p>
<p>We've all been there. Element is not in the DOM but it should be. Request came back from the server too late (why weren't you mocking your responses in the first place, huh? ;)). Promise is still unresolved. My app's state changed but those changes haven't propagated to all components yet. I changed my route's hash or query parameter, and test runner didn't catch that.</p>
<p>I got a false positive. I got a false negative. I got a race condition. I got inconsistent results. It works locally but my headless CI breaks.</p>
<p>Aaaaagr@#$%^&amp;...! Damn you, Selenium. I'm done with you! I'll just trust that I won't make any mistakes and I won't need integration tests. I'm sure I'll be fine.</p>
<p>...One month later, on your company's Slack channel...</p>
<pre><code class="language-txt">Failed: awesomeJoe's build (#404; push in ImTooAwesomeForTests/ThisForSureWontBreakAnything (this_for_sure_wont_break_anything)

Refactored like 95% of the App, but I'm sure it's working and we'll be fine (b4d455 by awesomeJoe)

Failing tests: If you see this, you know that you messed up
</code></pre>
<p><img src="https://kamilogorek.com/assets/images/blog/shrug.gif" alt="Shrug"></p>
<hr>
<h2>The World Where Browser Is Not a Black Box</h2>
<p>Protractor, Pioneer, Nightwatch.js, Intern and probably plenty of other testing frameworks out there in the wild use something which is called Selenium. Selenium is this magic black box that can understand your code and make browsers do what you ask them to do. Navigate to pages, click elements, get values, fill forms, control back/forward buttons, etc. But it being a black box can be problematic. Especially when testing asynchronous code.</p>
<p><img src="https://kamilogorek.com/assets/images/blog/selenium-graph.png" alt="Selenium Graph"></p>
<p>What happens is the following: when your test runner issues a test, it asks Selenium <em>to ask a browser</em> and returns an answer to you. For example, if you want to know whether a given element is already rendered, you ask Selenium to ask a browser, which in the end checks the existence of an element, gives that answer to Selenium, which hands it back to you. In other words, it's a middleware between your test runner and a browser. A black box.</p>
<p>It's problematic, because we have no knowledge of the browser's lifecycle, or &quot;event loop.&quot; We cannot wait for something to finish, know whether there are some unresolved promises or pending requests. If you ask Selenium for something, it'll blindly go to the browser and fetch your answer.</p>
<p>This is where <a href="https://www.cypress.io/">Cypress</a> shines. It's a complete test runner, which lives <strong>inside</strong> a browser, alongside your own application code. It knows everything about browser state, event loop, as well as your application's code.</p>
<p><img src="https://kamilogorek.com/assets/images/blog/cypress-graph.png" alt="Cypress Graph"></p>
<p>This simplifies things <strong>a lot!</strong> It will politely wait for all the things to happen first, before issuing your test assertions. And even more, it will wait for the previous command to finish, before moving to another one, as everything is promise-based. You don't have to use timeouts or any code like this anymore (thankfully, as timeouts are one of the biggest, if not <em>the</em> biggest source of race conditions and nondeterministic results).</p>
<p>&quot;But wait, there's more!&quot; A thing that helped me even more is a perfectly-crafted debugging environment. Every test that you run in Cypress saves the browser's state after <em>every</em> step. XHR Request, click, element query, location change. And you can go back and forth between those states, read the errors, debug an issue as you'd normally do in devtools, see the before/after screenshots. It's so useful!</p>
<p>And yes, I know it's closed Beta right now, but their team is really awesome, and they give away an access to everyone on their gitter.io channel. You should definitely <a href="https://gitter.im/cypress-io/cypress">come and say hi!</a></p>
<p><em>And I highly recommend watching the following official demo from the Cypress team:</em></p>
<iframe src="https://player.vimeo.com/video/119067384?title=0&byline=0&portrait=0" width="700" height="394" frameborder="0" webkitallowfullscreen mozallowfullscreen allowfullscreen></iframe>
<p><a href="https://vimeo.com/119067384">Cypress.io - Overview Demo</a> from <a href="https://vimeo.com/backbonerails">Brian Mann</a> on <a href="https://vimeo.com/">Vimeo</a>.</p>
<hr>
<h2>Code for Tests</h2>
<p>&quot;Alright, show me the magic now!&quot; Well, there's no magic. The Cypress API is dead simple. But, ok, ok, here it is:</p>
<pre><code class="language-js">describe(&quot;Navigation&quot;, function () {
  beforeEach(function () {
    cy.server().stubUserSession();
  });

  // your tests go here
});
</code></pre>
<p>What's that <code>stubUserSession</code>, you ask? It's our custom command we can create to make our code more DRY. Let's see its content:</p>
<pre><code class="language-js">Cypress.addParentCommand(&quot;stubUserSession&quot;, function () {
  const log = Cypress.Log.command({
    name: &quot;stubUserSession&quot;,
  });

  cy.route(&quot;POST&quot;, /session/, &quot;fixture:session/valid&quot;, { log: false }).then(
    () =&gt; log.snapshot().end()
  );
});
</code></pre>
<p>What a beautiful code! You create a command, give it a name, and ask to intercept all requests made to urls matching <code>/session/</code> RegExp. When it finds one, it will serve our <code>fixtures/session/valid.json</code> file and prevent the browser from making a real request. It will give us 100% repeatability.</p>
<p>Now, it's time for some actual tests.</p>
<pre><code class="language-js">it(&quot;should render all elements when user is logged in&quot;, function () {
  cy.visit(&quot;/dashboard&quot;)
    .get(&quot;[data-hook=navigation-header]&quot;)
    .should(&quot;exist&quot;)
    .get(&quot;[data-hook=navigation-footer]&quot;)
    .should(&quot;exist&quot;)
    .get(&quot;[data-hook=navigation-sidebar]&quot;)
    .should(&quot;exist&quot;);
});
</code></pre>
<p>I highly recommend using the <code>[data-hook=*]</code> pattern in all of your integration tests' code. It's a great way to separate concerns and specifically point out that it shouldn't be touched in your HTML code.</p>
<pre><code class="language-html">&lt;h1 id=&quot;page-title&quot; class=&quot;make-it-shine&quot;&gt;Hello World!&lt;/h1&gt;
</code></pre>
<p>You can query this element using <code>#page-title</code> or <code>.make-it-shine</code> selectors. But what happens when a designer comes to remove/change them? How can we know it's not referenced somewhere?</p>
<pre><code class="language-html">&lt;h1 id=&quot;page-title&quot; class=&quot;make-it-shine&quot; data-hook=&quot;page-title&quot;&gt;
  Hello World!
&lt;/h1&gt;
</code></pre>
<p>And now, you can simply use <code>[data-hook=page-title]</code>, and it won't break if someone changes <code>id</code> or a <code>class</code>.</p>
<p>Alright, back to the tests.</p>
<pre><code class="language-js">it(&quot;should display correct logo based on the current location&quot;, function () {
  cy.visit(&quot;/dashboard&quot;)
    .get(&quot;[data-hook=navigation-logo-dashboard]&quot;)
    .should(&quot;exist&quot;)
    .get(&quot;[data-hook=navigation-logo-search]&quot;)
    .should(&quot;not.exist&quot;)
    .visit(&quot;/search&quot;)
    .get(&quot;[data-hook=navigation-logo-dashboard]&quot;)
    .should(&quot;not.exist&quot;)
    .get(&quot;[data-hook=navigation-logo-search]&quot;)
    .should(&quot;exist&quot;)
    .go(&quot;back&quot;)
    .get(&quot;[data-hook=navigation-logo-dashboard]&quot;)
    .should(&quot;exist&quot;)
    .get(&quot;[data-hook=navigation-logo-search]&quot;)
    .should(&quot;not.exist&quot;)
    .go(&quot;forward&quot;)
    .get(&quot;[data-hook=navigation-logo-dashboard]&quot;)
    .should(&quot;not.exist&quot;)
    .get(&quot;[data-hook=navigation-logo-search]&quot;)
    .should(&quot;exist&quot;);
});
</code></pre>
<p>All those routes are client-side rendered, and the logo element reacts to an asynchronous change of the application's state (which is event-based in this scenario). We can see a usage of location controls as we use back/forward buttons and assertions negation using <code>not</code>.</p>
<p>Let's do something more complex. Let's manually log in a user, verify redirect, go to a <code>search</code> section and log them out, making sure that they have been redirected, but this time to the login form.</p>
<pre><code class="language-js">it(&quot;should allow user to login, navigate and logout from the app&quot;, function () {
  cy.server({ enable: false })
    .visit(&quot;/login&quot;)
    .server({ enable: true })
    .route({
      method: &quot;POST&quot;,
      url: /session/,
      status: 200,
      response: &quot;fixture:session/valid&quot;,
    })
    .get(&quot;[data-hook=login-form-username&quot;)
    .type(&quot;john.doe@example.com&quot;)
    .get(&quot;[data-hook=login-form-password]&quot;)
    .type(&quot;verysecurepassword&quot;)
    .get(&quot;[data-hook=login-form-submit]&quot;)
    .click()
    .url()
    .should(&quot;match&quot;, /dashboard/)
    .get(&quot;[data-hook=navigation-links-search]&quot;)
    .click()
    .url()
    .should(&quot;match&quot;, /search/)
    .route({
      method: &quot;DELETE&quot;,
      url: /session/,
      status: 204,
      response: {},
    })
    .route({
      method: &quot;POST&quot;,
      url: /session/,
      status: 401,
      response: &quot;fixture:session/invalid&quot;,
    })
    .get(&quot;[data-hook=navigation-logout]&quot;)
    .click()
    .url()
    .should(&quot;match&quot;, /login/);
});
</code></pre>
<p>It's only that much code and it works like a charm. One note about those two route changes. The first one is stubbing our delete session request, which will be issued once we click the logout button. And the second one is overriding our previous valid session, changing it to invalid. Why? Because if you don't do this, and your application is correctly validating the user's authentication state, it would still think that you're authenticated and most likely (if you implemented it that way), will redirect you back to a dashboard.</p>
<p>You may also be wondering about <code>.server({enable: false})</code> and <code>.server({enable: true})</code>. Remember how we used <code>stubUserSession</code> in our <code>beforeEach</code> block? It applies to all tests. And if we were to omit turning off requests interception here, our <code>.visit('/login')</code> call would redirect us instantly to a dashboard, as the application would think that we are already authenticated and there's no need to do this again. That's why we change the order. We disable our server stubs, go to the login page and only then attach the stub again. This way our initial <code>/login</code> call won't return an authenticated session. We could also do this by removing <code>stubUserSession</code> from <code>beforeEach</code>, and using it only when needed, or like this:</p>
<pre><code class="language-js">it('should allow user to login, navigate and logout from the app', function () {
  cy
    .route({
      method: 'POST',
      url: /session/,
      status: 401,
      response: 'fixture:session/invalid'
    })
    .visit('/login')
    .route({
      method: 'POST',
      url: /session/,
      status: 200,
      response: 'fixture:session/valid'
    })

    ...
})
</code></pre>
<p>The last test I'd like to show you is verifying that we can change the location's state (e.g. using <code>HistoryAPI</code>) directly, then through button clicks, and then using the back button, just for good measure. And making sure that other components, like search results can react to it.</p>
<pre><code class="language-js">it(&quot;should filter search results based on query parameters&quot;, function () {
  cy.stubSearchResults() // a stub that will return a 200 code response with 10 search results, 3 about places and 7 about people
    .get(&quot;[data-hook=search-form-query]&quot;)
    .type(&quot;Poland&quot;)
    .get(&quot;[data-hook=search-form-submit]&quot;)
    .click()
    .url()
    .should(&quot;not.match&quot;, /searchFilter=/)
    .get(&quot;[data-hook=search-results]&quot;)
    .children()
    .should(&quot;have.length&quot;, 10)
    .visit(&quot;/search?searchFilter=places&quot;)
    .get(&quot;[data-hook=search-results]&quot;)
    .children()
    .should(&quot;have.length&quot;, 3)
    .get(&quot;[data-hook=search-form-filter-people]&quot;)
    .click()
    .url()
    .should(&quot;match&quot;, /searchFilter=people/)
    .get(&quot;[data-hook=search-results]&quot;)
    .children()
    .should(&quot;have.length&quot;, 7)
    .go(&quot;back&quot;)
    .url()
    .should(&quot;match&quot;, /searchFilter=places/)
    .get(&quot;[data-hook=search-results]&quot;)
    .children()
    .should(&quot;have.length&quot;, 3);
});
</code></pre>
<p><em>Results of tests for one of the components in an app I'm working on right now:</em></p>
<p><img src="https://kamilogorek.com/assets/images/blog/cypress-tests-results.png" alt="Cypress Tests Results"></p>
<p>I've shown you less than 10% of what Cypress can actually do. Give it a spin, it can be set up within minutes and doesn't require any code changes in your application. It cannot get easier than this.</p>
<hr>
<h2>Yes, You Should Write Integration Tests</h2>
<p>Because, why not? They are the best way to tell if your application is working correctly. They allow you to iterate quickly, refactor large chunks of your application without fear of breaking it, and they are really easy (and fun!) to write. It's a great feeling to see your application being tested in real-time, seeing all the things being clicked, manipulated, forms filled and tests passing and changing color to green.</p>
<p>Don't be frightened, they won't bite you. They can only help you to be a productive and happy person. Your stress level will go down, your cortisol will drop, and you'll be able to get better sleep, build more muscles and lose fat more quickly, which will result in you being healthier. Because health comes first. It's basic logic. Write your integration tests. You'll be healthier and live longer. Don't thank me, just trust me. Been there, done that.</p>
]]>
      </content:encoded>
      <pubDate>Tue, 21 Feb 2017 00:00:00 GMT</pubDate>
    </item>
    <item>
      <title>Starting a Journey With Clojure and ClojureScript</title>
      <link>https://kamilogorek.com/blog/clojure-journey/</link>
      <guid isPermaLink="false">https://kamilogorek.com/blog/clojure-journey/</guid>
      <description>
        If you've never tried functional programming development, I assure you that this is one of the best time investments you can make. You will not only learn a new programming language, but also a completely new way of thinking. A completely different paradigm.
      </description>
      <content:encoded>
        <![CDATA[<p><em>Originally posted on <a href="http://corgibytes.com/blog/2017/01/03/clojure-journey/">corgibytes.com</a></em></p>
<hr>
<p><img src="https://kamilogorek.com/assets/images/blog/stack-of-books.jpg" alt="Stack of Books"></p>
<p><a href="https://clojure.org/">Clojure</a>, as described on their official page:</p>
<p>&quot;<em>Clojure is a dynamic, general-purpose programming language, combining the approachability and interactive development of a scripting language with an efficient and robust infrastructure for multithreaded programming. Clojure is a compiled language, yet remains completely dynamic – every feature supported by Clojure is supported at runtime. Clojure provides easy access to the Java frameworks, with optional type hints and type inference, to ensure that calls to Java can avoid reflection.</em></p>
<p><em>Clojure is a dialect of Lisp, and shares with Lisp the code-as-data philosophy and a powerful macro system. Clojure is predominantly a functional programming language, and features a rich set of immutable, persistent data structures. When mutable state is needed, Clojure offers a software transactional memory system and reactive Agent system that ensure clean, correct, multithreaded designs.</em>&quot;</p>
<hr>
<h2>Why Functional Programming</h2>
<p>If you've never tried functional programming development, I assure you that this is one of the best time investments you can make. You will not only learn a new programming language, but also a completely new way of thinking. A completely different paradigm.</p>
<p>Functional programming is on the rise. Clojure, Scala, F#, Erlang, Elixir, Elm, Haskell, only to name a few. Those are all functional languages, used by the biggest companies in the world to drive their major systems.</p>
<p>It's good to understand how they work, but it's even better to be able to write something using them. Always remember one thing: &quot;A programming language is just another tool.&quot; You should always pick a language based on your needs, not on how hyped it is or how much you love it. FP is the biggest paradigm next to OO and learning its basics will be worth it long term.</p>
<hr>
<h2>Why Clojure</h2>
<h3>&quot;Made simple&quot;</h3>
<p><a href="https://twitter.com/richhickey?lang=en">Rich Hickey</a> made it very clear that Clojure is, and will always be, a simple language. Minimal syntax, very condensed and short API, no types. That simplicity, when comparing to other functional languages, makes it relatively easy to learn Clojure.</p>
<p>There's no better way to understand the reasoning behind the choices than to listen to the creator himself. In just an hour, you'll get it:</p>
<p><a href="https://www.youtube.com/watch?v=VSdnJDO-xdg">Clojure Made Simple - Rich Hickey</a></p>
<p>If you still need convincing, here is more of his reasoning:</p>
<p><a href="https://www.youtube.com/watch?v=rI8tNMsozo0">Simplicity Matters — Rich Hickey</a></p>
<p><a href="https://www.youtube.com/watch?v=f84n5oFoZBc">Hammock Driven Development — Rich Hickey</a></p>
<p>Even <a href="https://twitter.com/unclebobmartin?ref_src=twsrc%5Egoogle%7Ctwcamp%5Eserp%7Ctwgr%5Eauthor">Robert C. Martin</a> aka Uncle Bob likes it! In my eyes, that's an extra five points in favor of &quot;why I should choose Clojure.&quot;</p>
<h3>Java</h3>
<p>I know, people tend to hate on <a href="https://www.java.com/en/">Java</a> because it's a huge monolith, yada, yada, yada, and it's Java. And for most of them, it should be put on the cons list rather than on the pros. But take a look at it from this perspective:</p>
<ul>
<li>plenty of people already know Java</li>
<li>you can run it on almost anything</li>
<li>there are well-established tooling and libraries</li>
<li>it's battle tested</li>
</ul>
<p>Other than for personal beliefs, I don't see why you wouldn't give it a try. Just like when you were introduced to new foods as a child, there's a huge chance that &quot;you don't like it&quot; without even having tried it. Yeees, I know everyone has done that at least once in their lifetime!</p>
<h3>ClojureScript</h3>
<blockquote>
<p><a href="https://clojurescript.org/">ClojureScript</a> is a compiler for Clojure that targets JavaScript.</p>
</blockquote>
<p>To paraphrase <a href="https://en.wikipedia.org/wiki/One_Ring">Sauron</a>: &quot;One language to rule them all, One language to find them, One language to bring them all and in the darkness bind them.&quot;</p>
<p>What if you could kill two birds with one stone? Would that convince you even more?</p>
<p>&quot;Developers hate him! See how he targeted all the biggest platforms using one simple trick!&quot;</p>
<p>Java is huuuge, we all know that. But you know what's the second biggest platform? Web. Browsers. Internet of Things. You can target all of those platforms with one language.</p>
<p>ClojureScript is exactly the same thing as Clojure, but it's compiled and emits JavaScript code. It takes care of all the quirks and can be transpiled almost exactly 1-to-1. Almost. There's always something, and this time we have to keep in mind that there's Java interop for Clojure and browsers API interop for ClojureScript, but it's a minor part of the language. All the core things work in the very same way. You can find plenty of case studies where people have taken their huge Clojure applications and translated them to JavaScript within a day or two.</p>
<p>The best introduction to this concept is this talk: <a href="https://www.youtube.com/watch?v=do-_nQL6tJg">Clojure All the Way Down: Finally a Useful LISP — Ricardo J. Méndez</a></p>
<hr>
<h2>How</h2>
<p>&quot;Alright, but how should I approach my learning process?&quot;</p>
<p>There are two ways: books and videos. Some people prefer the former and some the latter. I tried both and, to be honest, the latter one is my preferred method (although you might think it's the other way around by the photo I chose as an intro to this post). I enjoy the feeling of being &quot;mentored&quot; very much. I just like it more when someone is talking to me and demonstrating how things are done, rather than just reading about it.</p>
<h3>Books</h3>
<p>There are tons of books about Clojure. <em><a href="https://www.amazon.com/Clojure-Action-Elegant-Applications-JVM/dp/1935182595">Clojure in Action</a></em>, <em><a href="https://www.amazon.com/Clojure-Programming-Practical-Lisp-World/dp/1449394701">Clojure Programming</a></em>, <em><a href="https://www.amazon.com/Joy-Clojure-Michael-Fogus/dp/1617291412/ref=dp_ob_title_bk">The Joy of Clojure</a></em>, but I'd like to focus on two positions:</p>
<ul>
<li>
<p><em><a href="http://www.braveclojure.com/">Clojure for the Brave and True</a> — Daniel Higginbotham</em>
It's not often the case, but this book is <strong>FREE</strong> and you can jump to reading it straight away. Of course, I highly encourage you to buy a printed copy! It's one of the best books you can find on the topic. It explores it in a very easy to digest manner and approaches it from the point of view of people completely new to the functional programming world.</p>
</li>
<li>
<p><em><a href="http://www.goodreads.com/book/show/24701168-living-clojure">Living Clojure</a> — Carin Meier</em>
Carin's writing is the shortest of all the mentioned books, and it's also the most condensed one. You'll find everything you need to start your journey with Clojure. It's also written somewhat as a tale about &quot;Alice's Adventures in Wonderland.&quot; How cool is that?! It also contains what I found to be a great concept that could also help many of you: a &quot;Weekly Living Clojure Training Plan!&quot; It's split into seven weekly assignments, and step-by-step guide to learning Clojure.</p>
</li>
</ul>
<h3>Courses</h3>
<p><strong><a href="https://purelyfunctional.tv/">PurelyFunctionalTV — Eric Normand</a></strong></p>
<p>This is the best resource I've ever found when it comes to learning a new language from scratch. It holds your hand and guides you through all the basics, advanced topics and writing a whole complex application, explaining everything along the way.</p>
<p><strong><a href="https://www.youtube.com/watch?v=9A9qsaZZefw&amp;list=PLAC43CFB134E85266">The Clojure Language — Brian Will</a></strong> and <strong><a href="https://www.pluralsight.com/courses/clojure-fundamentals-part-one">Clojure Fundamentals — Alan Dipert</a></strong></p>
<p>Those two series are front-to-back introductions to Clojure. They both go through all the core concepts of the language and contain everything you need to know to start working on your projects.</p>
<p><strong><a href="https://lambdaisland.com/">Lambda Island</a></strong></p>
<p>This one isn't a course &quot;per se,&quot; but rather a series of tutorials on Clojure and ClojureScript. Very useful when we are at a given point in our learning process and would like to dive deeper into a specific topic.</p>
<h3>Additional resources</h3>
<p>Although I'll openly admit that I haven't read them yet, these are books that were often recommended. I am told they provide more understanding about Functional Programming. I'll read them one day!</p>
<ul>
<li><a href="http://www.goodreads.com/book/show/548914.The_Little_Schemer">The Little Schemer</a> by Daniel P. Friedman and Matthias Felleisen</li>
<li><a href="http://www.goodreads.com/book/show/43713.Structure_and_Interpretation_of_Computer_Programs">Structure and Interpretation of Computer Programs</a> by Harold Abelson, Gerald Jay Sussman and Julie Sussman</li>
<li><a href="http://www.goodreads.com/book/show/594288.Purely_Functional_Data_Structures">Purely Functional Data Structures</a> by Chris Okasaki</li>
<li><a href="http://www.goodreads.com/book/show/12169041-an-introduction-to-functional-programming-through-lambda-calculus">An Introduction to Functional Programming Through Lambda Calculus</a> by Greg Michaelson</li>
</ul>
]]>
      </content:encoded>
      <pubDate>Tue, 03 Jan 2017 00:00:00 GMT</pubDate>
    </item>
    <item>
      <title>Highlights of This Year's EuroClojure and ReactiveConf</title>
      <link>https://kamilogorek.com/blog/bratislava-conference/</link>
      <guid isPermaLink="false">https://kamilogorek.com/blog/bratislava-conference/</guid>
      <description>
        If you love old architecture and castles, you'll fall for Bratislava. Easily one of the most beautiful places you can visit in Europe, this Slovakian capital is small enough that you can drive/walk quickly to most places, but big enough to fill your schedule for a few days. It may surprise some to find out that, when it comes to software development, the area is very quickly becoming one of the European tech hubs. Last month, Bratislava hosted two big conferences in one week.
      </description>
      <content:encoded>
        <![CDATA[<p><em>Originally posted on <a href="http://corgibytes.com/blog/2016/11/08/bratislava-conferences/">corgibytes.com</a></em></p>
<hr>
<p>If you love old architecture and castles, you'll fall for Bratislava. Easily one of the most beautiful places you can visit in Europe, this Slovakian capital is small enough that you can drive/walk quickly to most places, but big enough to fill your schedule for a few days. It's also very close to Vienna (Austria), making it a real two-for-one bargain! Both places are very cheap, offer plenty of attractions and great -- oooh great -- food! It may surprise some to find out that, when it comes to software development, the area is very quickly becoming one of the European tech hubs. Last month, Bratislava hosted two big conferences in one week:</p>
<ul>
<li><a href="http://euroclojure.org/">EuroClojure</a>, the biggest Clojure-related conference, created by Cognicast (a company where Rich Hickey, creator of Clojure, and David Nolen, creator of ClojureScript, both work), and</li>
<li><a href="https://reactiveconf.com/">ReactiveConf</a>, which gathers all the ideas around reactive programming, asynchrony, real-time, React.js or React Native.</li>
</ul>
<hr>
<h2>The Extras</h2>
<p>Both conferences were hosted in the Old Market Hall, called <a href="http://staratrznica.sk/">Stará tržnica</a>. It's a huge, open-space building, and everything took place in the big room, which has a balcony surrounding it. It was a great idea to hold the event there, as you could always go grab a coffee, some pastries and still enjoy your talks, without missing a second. The sound was also very good, and you could hear everything from almost every place in the room. And the addition of a few screens only made it all that much easier.</p>
<p>The food (even though on the first day of EuroClojure I missed lunch :( because I went for a walk and they didn't have enough food) was just top-notch! I was even joking that they make my bulk-season very easy, as I could eat everything in there, and still wouldn't have enough. Slavic cuisine is just something that you have to try, and I promise, you'll fall in love with it.</p>
<p>Swag and promotional materials were very detailed and minimalistic. No unnecessary things, just a t-shirt, local honey wine and a snack. All useful things! I loved the schedule, which was printed as a page from an old paper, and the personalized stickers from ReactiveConf, where they used the speakers' talks to create wordplays: eg. &quot;Clojure your eyes for David Nolen,&quot; &quot;Rethink your DB with Michael Glukhovsky,&quot; &quot;Look at the code from the different Angular with Igor Minar,&quot; &quot;Spend 3 days in magic rEaLM with Richard Feldman.&quot; Unfortunately, the schedule wasn't useful during Day 1, as it changed quite a lot. I would have liked to have it printed on the small badge, or as an additional badge with only the schedule on it.</p>
<p>Oh, let's not forget about the after-parties! Although I'm a huge introvert and rarely talk to strangers (Ha! I forced myself just once during the last after-party, to talk to and thank David Nolen for all his talks, knowledge and work), I went to each one of them. And boy, oh boy, that Ice Bar after the first ReactiveConf's day was a blast! About -10 C (14 F), the room covered with ice, shot glasses made of ice that you could break after drinking your shot, and blue and red lights everywhere. Wow!</p>
<hr>
<h2>The Talks</h2>
<p>My one-sentence summary for each of the conferences would be:</p>
<ul>
<li>EuroClojure – &quot;Am I really that stupid?&quot;</li>
<li>ReactiveConf – &quot;I've already seen it somewhere.&quot;</li>
</ul>
<p>I don't know much Clojure (yet!), but I really want to learn it. This conference simply showed me just how much of a long haul that will be. But I'll get there… one day!</p>
<p>And don't get me wrong on ReactiveConf, it was a great experience, and I learned a lot of new things. But as a person who follows &quot;Twitter Trends&quot; every day, watches all conference recordings and reads quite a lot of articles, I simply felt that I already knew most of the elements presented in the talks. It felt like some things were just iterations on technologies that our industry saw years ago, and we are now coming full circle on.</p>
<h3>EuroClojure</h3>
<p>I enjoyed a lot of talks, but some of them just blew me away. My best of EuroClojure:</p>
<h4>Keynote: Now What? – David Nolen</h4>
<p>One of my favorite speakers ever. He's the creator of <a href="https://github.com/clojure/clojurescript">ClojureScript</a>, and every single talk of his is great. He takes and moves ideas from one programming paradigm or from one language to another, which so far works great. Heard of immutability, single state atom, hot-reloading or pure functions for UI development? ClojureScript has it all. This time, he was talking about how he wants to take ClojureScript to a much larger audience, what pieces of language he will focus on, what are the fundamentals that we should never forget, and how to make it easier for newcomers to get into the language.</p>
<h4>Clojure Is Not Afraid of the GPU – Dragan Djuric</h4>
<p>Performing millions of mathematical operations using a hardware that's more suitable than CPU, our good old GPU. How the internal works, why is it so hard to do that now, and how it compares to CPU operations. He described a few libraries that he wrote and how they compare to the same functions written in Clojure, Java, C, Python or other libraries written in mentioned languages. He was able to get as low as seconds instead of hours, or microseconds instead of milliseconds which sounds almost impossible!</p>
<h4>Making Machines that Make Music – Srihari Sriraman</h4>
<p>Generating music as close to &quot;human&quot; as possible. Using machine learning predictions to determine how to do it was a great idea. He showed how to translate music (Indian music, I believe, which sounds very different than our western music) and its concepts to a &quot;computer language&quot; and how to generate random melodies that sound like they have been actually written by us, humans.</p>
<h4>Keynote: Genetic Programming with clojure.spec – Carin Meier</h4>
<p>Self-healing code and <a href="http://clojure.org/about/spec">clojure.spec</a>, just wow! The concept of a function that's able to modify itself, based on other &quot;donor&quot; functions is simply awesome. And using clojure.spec to do that makes it much simpler than you thought. The first part of the talk covered how we can distinguish developers using the so-called &quot;Four Tribes of Programmers&quot;: Explorers, Alchemists, Wrestlers and Detectives. I really like that idea, it reminds me of Corgibytes' <a href="http://corgibytes.com/blog/makers/menders/software/2015/08/14/makers-vs-menders/">Makers and Menders</a>. And what <em>is</em> clojure.spec exactly and how we can use it for genetic programming. You should definitely see that talk for yourself! But until it's released, here are the <a href="http://www.slideshare.net/gigasquidcm/genetic-programming-with-clojurespec-and-beyond">slides</a>. Enjoy!</p>
<h3>ReactiveConf</h3>
<p>And, now, my best of ReactiveConf:</p>
<h4>Testing the Way It Should Be – Brian Mann</h4>
<p><a href="https://www.cypress.io/">Cypress.io</a>, functional testing framework, written from scratch, without Phantom.js which was the main source of most of the problems with testing nowadays. It looks great, works great and is already in beta. You just have to ask for access. It provides you with time travel, dom snapshots, great error messages, a very simple and readable API and makes working with async code a cinch. Not only do they provide a library, but also an electron-based UI, which speeds up your workflow quite a lot! I will definitely use it with my next project as soon as I can.</p>
<h4>Visualizing the Data Flow With Cycle.js – André Staltz</h4>
<p>A lot of people say André Staltz is a very controversial persona, but I have to admit that he is frequently right and he's able to change how people think about some concepts. And that's huge! I also heard that he's a Rockstar, but I cannot confirm that, as he forgot his shades (see the very same talk's vid from FutureFest to see what I'm talking about ;)). How observables work presented using Legos, yes, the very same Legos you probably played with as a child. How they work, why it is easy to debug them and how to do this, why we lack good debugging tools and why debugger just shows you a detailed picture of your code, instead of a whole picture. Mental model of a software is something that we don't think enough about, and this is one of the issues that he is trying to solve. He presented <a href="https://cycle.js.org/">Cycle.js</a> Developer Tools that makes reasoning about your code much easier by visualizing a whole data flow for every single action or observable event.</p>
<h4>No Xcode, Android Studio, Java, Swift, Objective C - How Far Can JavaScript Get You? – Brent Vatne</h4>
<p>He talked about <a href="https://getexponent.com/">Exponent</a>, which is a &quot;framework&quot; on top of React Native. It helps you with a lot of mundane tasks that require plenty of boilerplates and unify some things across Android/iOS development. But best of all, it doesn't make you use XCode or Android Studio! I had the &quot;pleasure&quot; of working with React Native last month on a new project, and the biggest pinpoint was indeed Android Studio. It's slow, CPU and memory heavy and it takes some time to actually get it running, even when following a simple step-by-step tutorial. I'll definitely give Exponent a try the next time I'm working with a mobile app.</p>
<p>That's it for now.</p>
<p>See you next year, folks!</p>
]]>
      </content:encoded>
      <pubDate>Tue, 08 Nov 2016 00:00:00 GMT</pubDate>
    </item>
    <item>
      <title>Setting up a Minimal, Yet Useful Javascript Dev Environment</title>
      <link>https://kamilogorek.com/blog/minimal-useful-javascript-environment/</link>
      <guid isPermaLink="false">https://kamilogorek.com/blog/minimal-useful-javascript-environment/</guid>
      <description>
        In an era of omnipresent frameworks, libraries and tooling, it may be hard to decide what tool to use and when. I know from experience, that the first thing you do, once you decide to write a module or CLI tool, is set up an environment. Some people love it, some hate it. But no matter on which side you are, you’ll most likely end up spending way too much time doing it, polishing every aspect of the setup.
      </description>
      <content:encoded>
        <![CDATA[<p><em>Originally posted on <a href="http://corgibytes.com/blog/2016/09/27/minimal-useful-javascript-environment/">corgibytes.com</a> and <a href="https://dev.to/corgibytes/setting-up-a-minimal-yet-useful-javascript-dev-environment">dev.to</a></em></p>
<hr>
<p>In an era of omnipresent frameworks, libraries and tooling, it may be hard to decide what tool to use and when.</p>
<p>I know from experience, that the first thing you do, once you decide to write a module or CLI tool, is set up an environment. Some people love it, some hate it. But no matter on which side you are, you'll most likely end up spending way too much time doing it, polishing every aspect of the setup.</p>
<p>Sure, you could use webpack, eslint, jasmine or even TypeScript to get great compile error messages.
The truth is though, most of the time, as developers, we can get by with tools that require almost no configuration. These &quot;out-of-the-box&quot; tools are usually perfectly acceptable, and will help us jump straight to solving the problem, while providing an almost instant feedback loop.</p>
<p>When talking about the minimal setup, things that come to mind are testing, linting, watching changes and making sure that you won't break anything before committing changes.</p>
<p>Here's a step-by-step to help you go from having nothing, to being productive in five minutes or less (depending on NPM's mood).</p>
<hr>
<h2>Init Node.js project and GIT repository</h2>
<pre><code class="language-sh"># Create a directory and cd into it (#protip – $_ holds argument of your last command)
$ mkdir awesome-module &amp;&amp; cd $_

# Initialize Node.js project with default settings
$ npm init --yes

# Create initial folders and files
$ mkdir lib test
$ touch index.js lib/meaningOfLife.js test/index.test.js test/meaningOfLife.test.js

# Initialize GIT repository and create initial commit
$ git init
$ git add -A; git commit -am &quot;Awesome Module, day one&quot;
</code></pre>
<hr>
<h2>Install tools</h2>
<p>Here, we'll use four simple modules, each having a single purpose. <a href="https://github.com/avajs/ava">Ava</a> for testing, <a href="https://github.com/feross/standard">Standard</a> for linting, <a href="https://github.com/kimmobrunfeldt/chokidar-cli">Chokidar-cli</a> for file watching and <a href="https://github.com/nlf/precommit-hook">Precommit-hook</a> for automatically running npm scripts.</p>
<p>Why those tools? Because they don't require any configuration and take the cognitive load from your brain. One less thing to think and worry about.</p>
<pre><code class="language-sh">$ npm i --save-dev ava standard chokidar-cli precommit-hook
</code></pre>
<p>Remember to create a <code>.gitignore</code> file and add <code>node_modules</code> to it! We don't want it in our repository.</p>
<hr>
<h2>Set up tools</h2>
<p>Open <code>package.json</code> and add those scripts to your file.</p>
<pre><code class="language-json">&quot;scripts&quot;: {
  &quot;test&quot;: &quot;ava&quot;,
  &quot;lint&quot;: &quot;standard&quot;,
  &quot;dev&quot;: &quot;chokidar '**/*.js' -c 'standard &amp;&amp; ava'&quot;
},
&quot;pre-commit&quot;: [&quot;test&quot;, &quot;lint&quot;],
</code></pre>
<p>Aaaand you are done! Once you run <code>npm run dev</code> you'll get all of your JS files linted by Standard.js and tests run by Ava. There's nothing more to it, and you can start working right away.</p>
<p>The same goes for creating GIT commits. You won't be able to do so, unless all of your tests are green and linter is happy.</p>
<p>Two things worth noting:</p>
<ol>
<li>You don't have to install <code>standard</code> or <code>ava</code> globally, as they are run from within the <code>node</code> context.</li>
<li>Because we use <code>&amp;&amp;</code> instead of <code>;</code> here in the <code>dev</code> script, tests won't be triggered unless you pass linter rules. It makes the feedback loop even faster.</li>
</ol>
<hr>
<h2>Working with the setup</h2>
<p>Because the environment assumes you'll work in TDD style (and you probably should!), once you run your <code>dev</code> script, you can create tests and they will be added to the test suite, without any need for restarting a watcher or rebuilding anything.</p>
<p>Let's create the first test.</p>
<pre><code class="language-js">// test/meaningOfLife.test.js
const test = require(&quot;ava&quot;);
const meaningOfLife = require(&quot;../lib/meaningOfLife&quot;);

test(&quot;Real meaning of life&quot;, (t) =&gt; {
  t.is(meaningOfLife(), 42);
});
</code></pre>
<p>Once you save the file, you'll get instantly notified that one of your tests is failing. Let's fix it.</p>
<pre><code class="language-js">// lib/meaningOfLife.js
module.exports = () =&gt; 42;
</code></pre>
<p>And we are back to green! It's as simple as that. Let's create another module that'll multiply a numeric parameter, unit test this module and see whether it'll work nicely with our &quot;meaning of life&quot; (note that it's already an integration test, not unit!).</p>
<pre><code class="language-js">// lib/multiply.js
module.exports = (number) =&gt; {
  if (typeof number !== &quot;number&quot;)
    throw new TypeError(&quot;Only numbers can be multiplied!&quot;);
  return number * 2;
};
</code></pre>
<pre><code class="language-js">// test/multiply.test.js
const test = require(&quot;ava&quot;);
const multiply = require(&quot;../lib/multiply&quot;);

test(&quot;Can multiply numbers&quot;, (t) =&gt; {
  t.is(multiply(10), 20);
});

test(&quot;Throws when you try to multiply non-number value&quot;, (t) =&gt; {
  t.throws(() =&gt; multiply(&quot;ohai!&quot;), &quot;Only numbers can be multiplied!&quot;);
});
</code></pre>
<p>Now, to test it all together:</p>
<pre><code class="language-js">// test/index.test.js
const test = require(&quot;ava&quot;);
const awesomeModule = require(&quot;../index&quot;);

test(&quot;Works nicely together&quot;, (t) =&gt; {
  t.is(awesomeModule(), 84);
});
</code></pre>
<pre><code class="language-js">// index.js
const meaningOfLife = require(&quot;./lib/meaningOfLife&quot;);
const multiply = require(&quot;./lib/multiply&quot;);

module.exports = () =&gt; multiply(meaningOfLife());
</code></pre>
<p>It works! In just a few minutes, we got everything up and running.</p>
<p>We, as developers, are often charmed by shiny new tools. We seem to forget that those things should make our work easier, faster and less error prone. The simplest solutions are more than enough, more often than we think. Instead of spending an enormous amount of time on the setup, we should spend it on writing the software itself. And following these steps will allow you to do just that.</p>
<p>Once your project starts to grow, you may find yourself in need of something more complex. In most cases, however, it just won't happen. And those tools will suit your needs quite well for a long, long time.</p>
]]>
      </content:encoded>
      <pubDate>Tue, 27 Sep 2016 00:00:00 GMT</pubDate>
    </item>
  </channel>
</rss>